Blocks are the main part of Scratch programming. Here are the ones you’ll start off with!
~Motion Blocks~
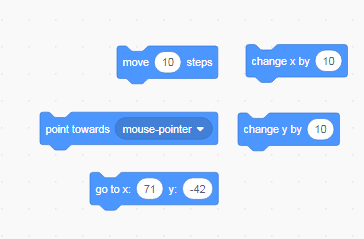
Move 10 Steps: This block moves the position of your character in whatever direction it is currently facing. Because the number 10 is written inside a white circle, you can change it to however many steps you want your sprite to move.
Point Towards Mouse Pointer: This block makes your sprite (character) point in the direction of your mouse. If you click on the “mouse pointer” part of the block, a drop down menu will show up so you can pick what action you would like the block to perform. These options include other sprites that are part of your program.
Go to x: 71 y: -42: This block makes it so that you can move your sprite anywhere on the screen. For example, if you want your sprite to start in a certain position when your program starts, you can put this block at the beginning of your code. Play around with the numbers to find what combination fits you best! You can change them by clicking the white circle and entering the numbers you want. Keep in mind, the center of the screen is at the values (0, 0), which means that x is 0 and so is y.
Change x by 10: This block is similar to the Move 10 Steps block, where you can change the value to fit however much you want to move. However, with this block, you can only move horizontally (from left to right). With the Move 10 Steps block, you can move in whichever direction your sprite is facing.
Change y by 10: Much like the last block, you can change the value of this block to move your sprite as well. The biggest difference between this block and the previous is that this block can only move vertically (up and down). You can change the value from 10 to whatever value you wish, but the sprite will only move up and down. Check out our lesson on the coordinate plane to understand why!
~Look Blocks~
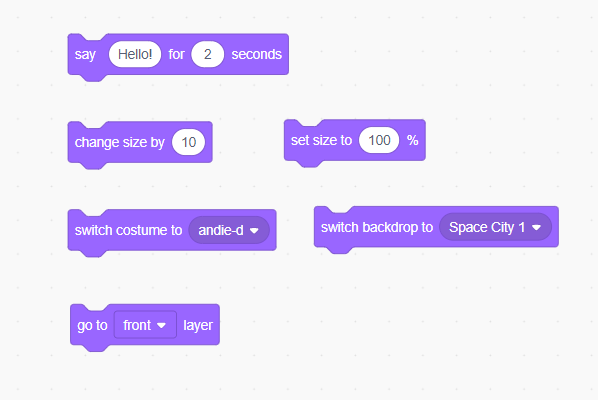
Say Hello for 2 Seconds: This block does exactly as it says! When you add this block to your code, your sprite will say, “Hello!” for whatever value of time you add in, which in this case, is 2 seconds. You can change what your sprite says as well as how long it takes to say it. For example, if you have a larger phrase like, “Hello! My name is Pico, and my favorite color is blue,” you want to change your time to 3 or 4 seconds. This makes it easier for people to read what your sprite is saying.
Change Size by 10: This block changes how big your sprite is. For example, if you want your sprite to get larger as it eats a piece of cake, you can change its size by 20. Play around with the values to find which size suits you best.
Set Size to 100%: This block can set the size of your sprite back to its original version. It can also increase or decrease the size of your sprite. You can change the value to 50% to make the sprite half its original size, or to 200% to make it double your original size! Keep in mind that these are just example values, and you can change the numbers to whatever is best for your game.
Switch Costume to andie-d: This block changes the costume, of your sprite. You can check the costumes of your sprite by clicking your sprite and going into costumes in the upper left hand menu. You can add or delete costumes depending on your program. Costumes can show a change in appearance or action. Most pre-made sprites come with their own costumes, so you can change or delete them accordingly. The costume names will be different depending on which sprite you have selected.
Switch Backdrop to Space City 1: This block changes the background of your program when you use it. An example of its use would be when you want to show that how it’s changing outside from day time to night time. You can use this block there to show that the setting outside has changed as well.
Go to Front Layer: Each background adds another layer. So, if you don’t want a sprite on a specific background, you can make it go back a layer and it will show up with the backdrop behind the current one when it’s time for that scene to show.
~Sound Blocks~

Play Sound Basketball Bounce Until Done: This block plays the sound that you want your character to perform. In this case, our character is a basketball player so he comes with the sound Basketball Bounce. However, other sprites come with other sounds. In addition to this, you can upload the sounds you would like with the sound library. This way, you can use any sound you like from Scratch’s vast library, regardless of the sprite you use. You can also record a sound such as yourself saying something in the sounds tab.
Stop All Sounds: This block does exactly as it says: it stops all the sounds. You might want to use it at the end of a program to make sure that the sounds end on time.
Change volume by -10: This block changes the volume of the sound that is playing. You can enter negative values (numbers with a “-” in front of them) or positive values. Either way, you can change the strength of the sounds to change the effect of the sounds that are playing.
Set Volume to 100%: Similar to the Set Size to 100%, this block can set the sound back to its original volume. It can also increase or decrease the volume depending on the numbers you put in.
~Event Blocks~

These blocks are perhaps the most important blocks in the entire Scratch language; without them, you can’t do anything! Here are a few to get you started:
When Flag Clicked: This block cannot be changed, but its purpose is to let you do something upon an action. In this case, if you press the green flag, your sprite will perform whichever blocks you have added under this event.
When This Sprite Clicked: Similar to the previous block, this block will do whatever you have put under it if the person playing the game clicks on the specific character (sprite) it is coded for.
When Space Key Pressed: The function of this block is the same as the previous 2, but it carries out the command when the space key or any other key is pressed. You can change the option from space key to another letter, number, or arrow key as well.
When I Receive Message 1: In Scratch, there is an interesting feature called broadcasting. It’s like sending a message to another sprite as if they were communicating over walkie-talkies! One sprite will perform a certain operation when it receives a certain message; you can name this message whatever you want.
Broadcast Message 1: This block helps one sprite broadcast the message that the other sprite receives. This message makes it so that the other sprite does not perform a specific action before this sprite tells it to.
When Backdrop Switches to Backdrop 1: The function of this block is to perform a specific action when the background changes. For example, maybe when the background changes from the introduction screen to the next screen, you make a sprite show up.
~Control Blocks~
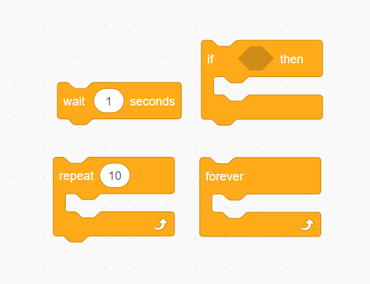
Wait 1 Second(s): With this block, you can tell your sprite or background to wait a certain amount of time (in seconds) to wait before performing an action. You can change the number from 1 second to however many seconds you need.
Repeat 10: This here is what we call a loop. Whatever blocks you put inside this loop will repeat however many times you enter. For example, if I put the block Play Sound Meow Until Done, the sound meow will repeat 10 times before stopping. However, it only works this way if you put the meow block inside the loop.
If– Then: This block is designed so that you put in another block (from the light blue sensing section) that fits the shape of the darkened yellow section. For example, you could have the block say if touching mouse pointer, then change y by 20. In this piece of code, I can put in whatever I want my sprite to react to, and how i want my sprite to react to it.
Forever Loop: This is perhaps the most commonly used loop in Scratch. Whatever you put in the forever loop will repeat for; you guessed it! It will repeat for forever. You can use this block whenever you need an action to be performed throughout the program. For example, if you want to play a specific sound throughout the animation, you can put that sound in the forever loop.
Refer back to this introduction if you are working on a project but don’t remember how a certain block works. If there is a block (not listed above) that you have a question on, feel free to send us an email or comment on Scratch asking how that block works.
Happy Coding!
